
- 0xdurakiRunning Android Apps on MacOS
There are multiple ways to run Android applications on MacOS. Some of tested methods are outlined below, while others are presented by Laurie’s Android Emulators for RE notes on her GitHub, albeit seems a bit old.
Running Android apps via MuMuPlayer Pro
- Download MuMuPlayer Pro from Official Website
- Install MuMuPlayer Pro using downloaded
*dmgfile - Open MuMuPlayer Pro and start the Android Device
- You may need to login to MuMuPlayer Pro account (you can create a free 7-days account)
 MuMuPlayer Pro - Welcome Screen
- Inside the AndroidOS Screen you can either:
- Install
*apkfile via MuMuPlayer menuber via “Tools => Install APK”, or by drag-dropping apk - Download the app. via Google Playstore within MuMuPlayer Android Device Screen
- Install
 MuMuPlayer Pro - Android Device Screen
- To get Android Device details or to Export Logs
- Click on the “Help” in menubar, then “Show Android Device Information”
- In “Android Device Information” window, click “Export Log” button
 MuMuPlayer Pro - Device Information - Export Log
Games and applications not compatible with MuMuPlayer Pro: Call of Duty®: Mobile, Call of Duty®: Warzone™ Mobile, GODDESS OF VICTORY: NIKKE, KartRider: Drift, Warcraft Rumble, NIGHT CROWS, DOFUS Touch: A WAKFU Prequel, Fortnite, Shopee Live.
Start MuMuPlayer Android Platform Tool adb via Terminal
- Start the Android Device and wait for the Running state in MuMuPlayer
- Enter the Terminal command below to start
adb server
$ adb connect 127.0.0.1:26624 && adb -s 127.0.0.1:26624 unroot && sleep 1 && adb connect 127.0.0.1:26624 && adb -s 127.0.0.1:26624 shell
Debugging Android Apps via MuMuPlayer
Developers can now use Android Studio and MuMuPlayer Pro to debug applications, using the steps below:
- Find the IPv4 address of the device running MuMuPlayer Pro
- Open “Settings => Network” on the MacOS Host
- Click “Advanced…” on the current Network selection, and click “TCP/IP” tab
- Check the IP address under IPv4 Address, for example:
192.168.0.117
- Start the Android Device from MuMuPlayer Pro
- Click “Tools” on the top menubar
- Click “Open ADB (xxxxx)” in the “Tools” top menubar
- The “xxxxx” is an ADB Terminal IP number (ie.
26624)
- Using iTerm execute the following commands
adb kill-serveradb connect 192.168.0.117:26624, replacing the IPv4/Port
- Then you can select this
Android Devicein Android Studio Debug Interface, see this image
- Click on the “Build and Run” to install the debugging APK to the Android Device
- Click on the “Attach” button to start debugging the app
Install Certificates for MITM via MuMuPlayer
You can install Custom Certificates and execute MITM (Packet Capture) on MuMuPlayer Pro, using the outlined steps below. A separate note titled “Android MITM for HTTP/S Protocols” describes and provides more of a in-depth tutorial on how to intercept and capture traffic for both emulated, and a real Android devices.
- Download the certificate from the packet capturing software
- For Charles: Open Charles, click on the menubar “Help => SSL Proxying => Save Charles Root Certificate …”
- For Burp: Open Burp, visit “http://burp” from integrated Burp Chromium Browser, and click “CA Certificate”
- Start the Android Device from MuMuPlayer Pro
- Open “Settings Center” from the top menubar, click on “Data” tab
- Set “System Disk Mode” to Writeable and restart the Android Device in MuMuPlayer Pro
- Click on the top menubar again, select “Tools => Open ADB”
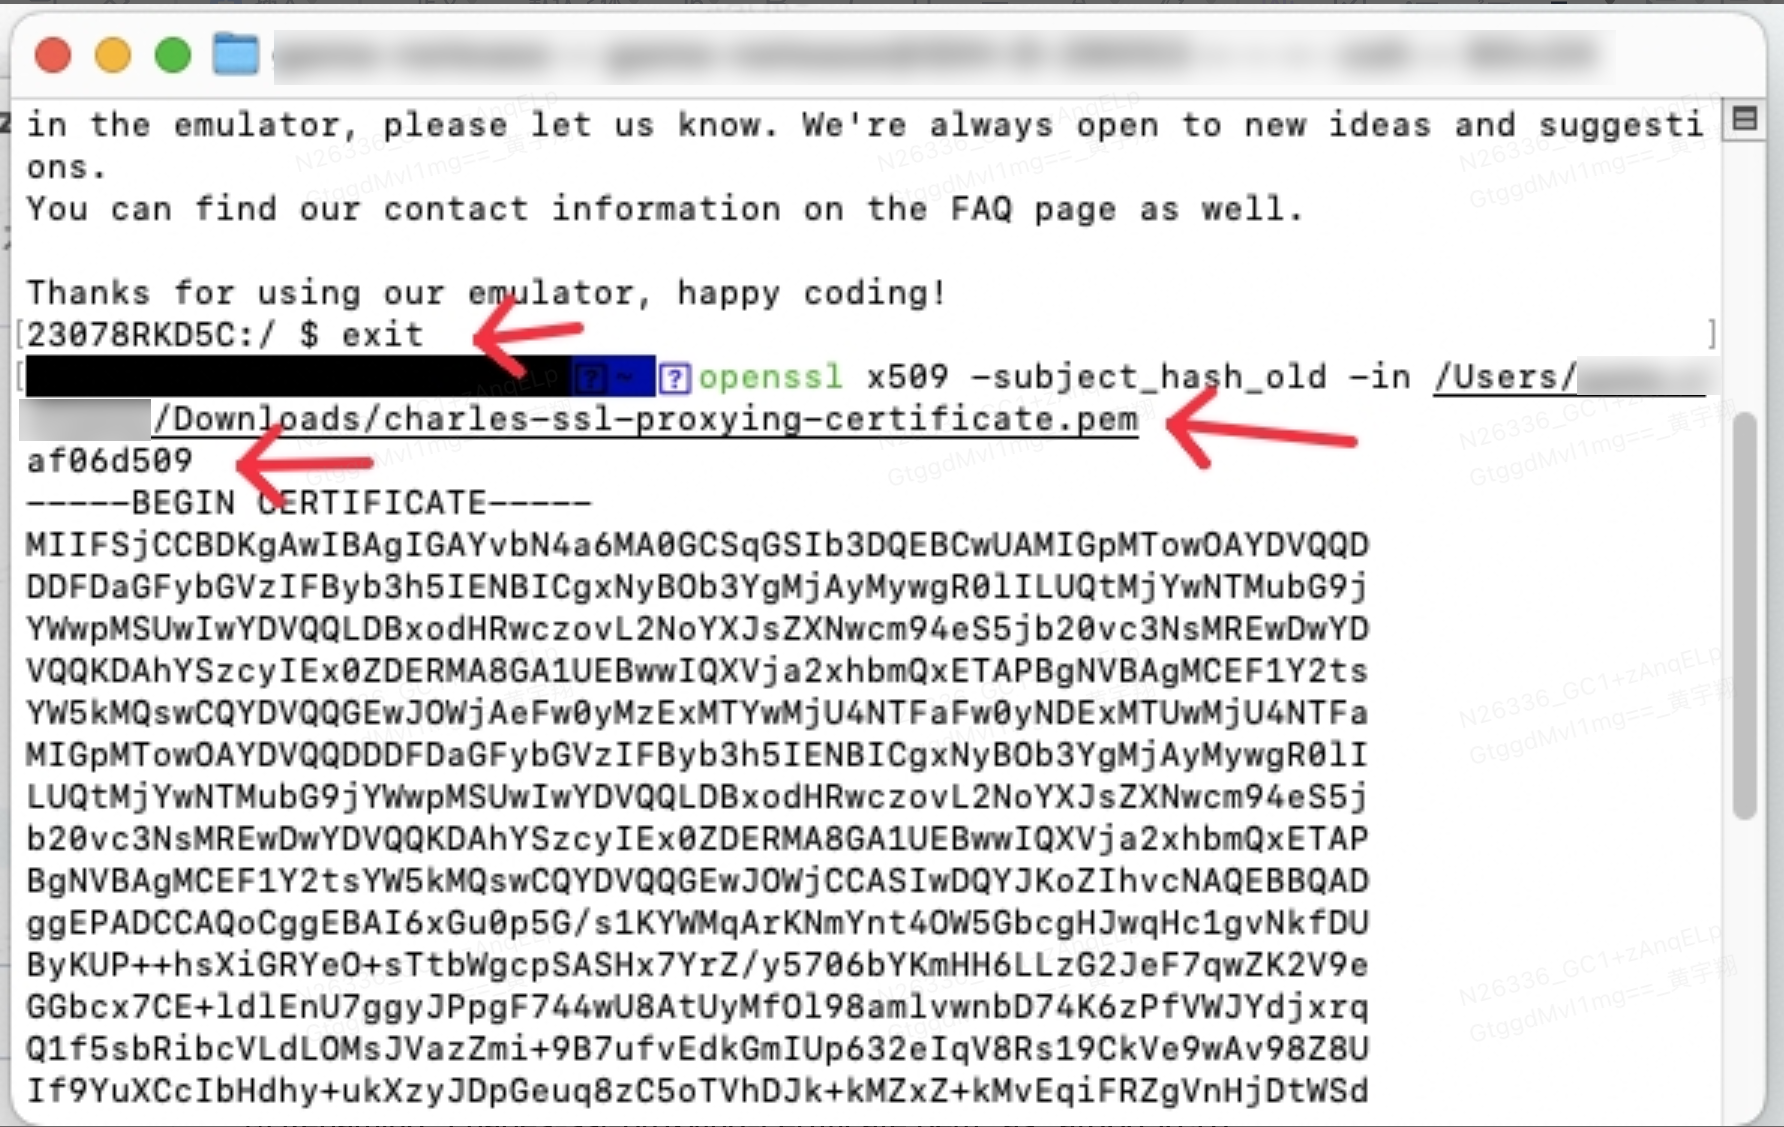
- Execute the following commands in adb shell term:
exit- popup from adb shell to MacOS host ttycd /Applications/MuMuPlayer.app/Contents/MacOS/MuMuPlayerPro.app/Contents/MacOS/tools/openssl x509 -subject_hash_old -in /tmp/<your-ssl-proxying-certificate.pem>- changing the path tocert.pem- the above command output result’s first line is similar to:
af06d509, see this image
- the above command output result’s first line is similar to:
- Rename the certificate file from
/tmp/<your-ssl-proxying-certificate.pem>to/tmp/af06d509.0- replacing w/ actual names
- Use ADB to put the certificates into the system directory
- Using iTerm cd in this dir:
cd /Applications/MuMuPlayer.app/Contents/MacOS/MuMuEmulator.app/Contents/MacOS/tools/ - Use commands:
./adb- note that root will prompt for superuser access in the emulator, check the allow options./adb push /tmp/af06d509.0 /system/etc/security/cacerts/- copy the local cert to cacerts dir in device./adb shell "chmod 664 /system/etc/security/cacerts/af06d509.0"- change cert perms in device
- Configure your Packet Capture software to allow SSL Proxying from devices in the same network, as usual
Important Android App. Directories
Important directories: The directories listed below are the most important directories in an Android device and are worth being aware of.
/data/data: Contains all the applications that are installed by the user.
/data/user/0: Contains data that only the app can access.
/data/app: Contains the APKs of the applications that are installed by the user.
/system/app: Contains the pre-installed applications of the device.
/system/bin: Contains binary files.
/data/local/tmp: A world-writable directory.
/data/system: Contains system configuration files.
/etc/apns-conf.xml: Contains the default Access Point Name (APN) configurations. APN is used in order for the device to connect with our current carrier’s network.
/data/misc/wifi: Contains WiFi configuration files.
/data/misc/user/0/cacerts-added: User certificate store. It contains certificates added by the user.
/etc/security/cacerts/: System certificate store. Permission to non-root users is not permitted.
/sdcard: Contains a symbolic link to the directories DCIM, Downloads, Music, Pictures, etc.
Emulators
- Genymotion (customize IMEI and Android ID)
- Bluestacks
- Andy
- Android Studio Emulators, see rooting the emulator
- ARM64 Android Emulator
- Android Emulators for RE
Emulator via AVD without Android Studio
$ brew install android-commandlinetools
$ brew info android-commandlinetools
# Default Android SDK root is /opt/homebrew/share/android-commandlinetools
                                                 /android-commandlinetools/cmdline-tools/latest/bin/avdmanager
                                                 /android-commandlinetools/cmdline-tools/latest/bin/lint
                                                 /android-commandlinetools/cmdline-tools/latest/bin/retrace
                                                 /android-commandlinetools/cmdline-tools/latest/bin/sdkmanager
                                                 /android-commandlinetools/cmdline-tools/latest/bin/apkanalyzer
                                                 /android-commandlinetools/cmdline-tools/latest/bin/screenshot2
# ...

$ lvim ~/.zshrc                                  # add cmdline-tools/bin to $PATH env var
# ...
# export ANDROID_HOME="$HOME/Library/Android/sdk"
# export ANDROID_SDK_ROOT="$ANDROID_HOME"
# export ANDROID_AVD_HOME="$HOME/.android/avd"
# ...
# export PATH="/opt/homebrew/share/android-commandlinetools/build-tools/35.0.0:$PATH"
# export PATH="/opt/homebrew/share/android-commandlinetools/cmdline-tools/latest/bin:$PATH"
# export PATH="/opt/homebrew/share/android-commandlinetools/emulator:$PATH"

$ source ~/.zshrc                                # reload zshrc source file

$ avdmanager list devices                       # list all the available devices
# ---------
# id: 14 or "Nexus 9"
#    Name: Nexus 9
#    OEM : Google

$ sdkmanager --update                            # update all installed sdk packages
$ sdkmanager --list_installed                    # list all installed sdk packages
# Installed packages:
#   Path                                                        | Version | Description                                | Location
#   -------                                                     | ------- | -------                                    | -------
#   build-tools;35.0.0                                          | 35.0.0  | Android SDK Build-Tools 35                 | build-tools/35.0.0
#   emulator                                                    | 35.2.10 | Android Emulator                           | emulator
#   platform-tools                                              | 35.0.2  | Android SDK Platform-Tools                 | platform-tools
#   system-images;android-35-ext14;google_apis_playstore;x86_64 | 1       | Google Play Intel x86_64 Atom System Image | system-images/android-35-ext14/google_apis_playstore/x86_64
#
# Available Packages:
#  Path                                                                            | Version           | Description
#  -------                                                                         | -------           | -------
#  ...
#  system-images;android-35;google_atd;arm64-v8a                                   | 1                 | Google APIs ATD ARM 64 System Image

# sdkmanager --list                             # list all available sdk packages
$ sdkmanager system-images;android-35;google_apis_playstore;arm64-v8a     # install specific sdk package
# Accept? (y/N): y
# [========                               ] 21% Downloading arm64-v8a-35_r09.zip..

# create a virtual device using avd
#      '-n' flag to specify custom name
#      '-k' flag to specify desired Android API to install
#      '-d' flag to specify specific hardware profile
$ avdmanager create avd -k "system-images;android-35;google_apis_playstore;arm64-v8a" -n "Android-ABIv.35_Google_API-arm64-v8a"
# Auto-selecting single ABI arm64-v8a
# Do you wish to create a custom hardware profile? [no]
# ...

$ avdmanager list avd                             # list created avd
# Available Android Virtual Devices:
#     Name: Android-ABIv.35_Google_API-arm64-v8a
#     Path: /Users/hduraki/.android/avd/Android-ABIv.35_Google_API-arm64-v8a.avd
#   Target: Google Play (Google Inc.)
#           Based on: Android API 35 Tag/ABI: google_apis_playstore/arm64-v8a
#   Sdcard: 512 MB

$ emulator -list-avds                             # list avd that can be emulated
# Android-ABIv.35_Google_API-arm64-v8a

$ lvim ~/.android/avd/Android-ABIv.35_Google_API-arm64-v8a.avd/config.ini     # enable cold boot for the emulator
# fastboot.forceColdBoot = yes
# hw.keyboard = yes
# hw.mainKeys = yes
# fastboot.forceChosenSnapshotBoot = no
# firstboot.bootFromDownloadableSnapshot = yes
# firstboot.bootFromLocalSnapshot = yes
# firstboot.saveToLocalSnapshot = no

$ emulator -avd Android-ABIv.35_Google_API-arm64-v8a -scale 1.3 -writable-system -selinux permissive -qemu         # start an avd with specified name, screen size scale and w/ writeable partition system
# ... this should start Android Emulator ....
#         WARNING:
#         Before rooting the Android Virtual Device, you must disable snapshot for cold boot. If you forgot
#         to disable the snapshot feature, the device will be going back to default state before rooting,
#         and all data after Android has been rooted will be gone.
#         ----
#         To disable snapshot before rooting the device, start the emulator with chosen AVD, then click on the
#         3 dots icon, then select "Snapshots" from the sidebar, and select "Settings" pane. In the pane "Save
#         quick-boot state on exit for AVD: "[AVD_NAME] API [API_VERSION]" select "No" and click "Save Now".
#         In the pane "Delete invalid snapshots" select "Ask" and click "Save Now" again. Reboot/Restart your AVD
#         now.


$ adb devices
# List of devices attached
# emulator-5554	device

$ adb shell
# emu64a:/ $ whoami
# shell

# Rooting the Android AVD using RootAVD script
$ cd ~/utils/clone
$ git clone https://gitlab.com/newbit/rootAVD
$ cd rootAVD
#

$ ./rootAVD.sh
# rootAVD A Script to root AVD by NewBit XDA
# Usage:	rootAVD [DIR/ramdisk.img] [OPTIONS] | [EXTRA ARGUMENTS]
# ...

$ ./rootAVD.sh ListAllAVDs
#
# Command Examples:
# ./rootAVD.sh system-images/android-35/google_apis_playstore/arm64-v8a/ramdisk.img
# ./rootAVD.sh system-images/android-35/google_apis_playstore/arm64-v8a/ramdisk.img FAKEBOOTIMG
# ./rootAVD.sh system-images/android-35/google_apis_playstore/arm64-v8a/ramdisk.img DEBUG PATCHFSTAB GetUSBHPmodZ
# ./rootAVD.sh system-images/android-35/google_apis_playstore/arm64-v8a/ramdisk.img restore
# ./rootAVD.sh system-images/android-35/google_apis_playstore/arm64-v8a/ramdisk.img InstallKernelModules
# ./rootAVD.sh system-images/android-35/google_apis_playstore/arm64-v8a/ramdisk.img InstallPrebuiltKernelModules
# ./rootAVD.sh system-images/android-35/google_apis_playstore/arm64-v8a/ramdisk.img InstallPrebuiltKernelModules GetUSBHPmodZ PATCHFSTAB DEBUG
# ./rootAVD.sh system-images/android-35/google_apis_playstore/arm64-v8a/ramdisk.img AddRCscripts

$ ./rootAVD.sh system-images/android-35/google_apis_playstore/arm64-v8a/ramdisk.img
# [!] and we are NOT in an emulator shell
# ...
# Dumping cpio: [ramdisk.cpio]
# [*] repacking back to ramdisk.img format
# [!] Rename Magisk.zip to Magisk.apk
# [*] Pull ramdiskpatched4AVD.img into ramdisk.img
# [-]
# [*] Pull Magisk.apk into
# [-]
# [*] Pull Magisk.zip into .
# [-]
# [-] Clean up the ADB working space
# [-] Install all APKs placed in the Apps folder
# [*] Trying to install Apps/Magisk.apk
# [*] Performing Streamed Install
# [*] Success
# [-] Shut-Down & Reboot (Cold Boot Now) the AVD and see if it worked
# [-] Root and Su with Magisk for Android Studio AVDs
# [-] Trying to shut down the AVD

# once completed, start the avd again using the 'emulator ...' command
$ emulator -avd Android-ABIv.35_Google_API-arm64-v8a -scale 1.0 -writable-system -selinux permissive -qemu
Open the app drawer on your AVD and you should see ‘Magisk’ application installed. Open the ‘Magisk’ app on the AVD. If you see an error stating that Magisk requires additional setup, click on the OK button and let the AVD reboots itself.
 Android Virtual Device - Rooted - Magisk App
Once rebooted, open the Magisk app again and see if it’s working. Inside the “Magisk”, it should state the following:
- Installed:
26.4 (26400) - Zygisk: No
- Ramdisk: Yes
If the Installed status says “N/A”, that means magisk failed ot install. For Android 34, sometimes you must use FAKEBOOTIMG method to root the AVD, as shown below:
$ ./rootAVD.sh system-images/android-35/google_apis_playstore/arm64-v8a/ramdisk.img FAKEBOOTIMG
# ...
# [?] Choose a Magisk Version to install and make it local
# [s] (s)how all available Magisk Versions
# [1] local stable '26.4' (ENTER)
# [2] stable 26.4
# [3] canary ...
# [4] alpha ...
2 <--- type 2 and press Enter
# [-] You choose Magisk stable Version 26.4
# ....
Once completed, try accessing the adb shell and gaining the root privileges, as described below:
$ adb devices
# List of devices attached
# emulator-5554	device

$ adb shell
# emu64a:/ $ su
# emu64a:/ # whoami
# root
To set and use adb TTY shell always as a root, we need to configure additional properties:
$ adb shell su -c "setprop ro.secure 0"
$ adb shell su -c "setprop ro.debuggable 1"
$ adb shell su -c "setprop persist.service.adb.enable 1"
$ adb shell su -c "resetprop ro.debuggable 1"
$ adb shell su -c "resetprop ro.secure 0"
$ adb shell su -c "resetprop service.adb.root 1"
$ adb shell su -c "setenforce 0"
$ adb shell su -c "magiskpolicy --live 'allow adbd adbd process setcurrent'"
$ adb shell su -c "magiskpolicy --live 'allow adbd su process dyntransition'"
$ adb shell su -c "magiskpolicy --live 'permissive { su }'"
$ adb shell su -c "kill -9 `ps -A | grep adbd | awk '{print $2}'` "
Or use the onliner below:
$ adb shell
$ su -c "resetprop ro.secure 0" && su -c "resetprop persist.service.adb.enable 1" && su -c "resetprop ro.debuggable 1" && su -c "resetprop ro.secure 0" && su -c "resetprop service.adb.root 1" && su -c "setenforce 0" && su -c "magiskpolicy --live 'allow adbd adbd process setcurrent'" && su -c "magiskpolicy --live 'allow adbd su process dyntransition'" && su -c "magiskpolicy --live 'permissive { su }'" && su -c "kill -9 `ps -A | grep adbd | awk '{print $2}'` "
Now try adb shell, you should end up in root tty-shell:
$ adb shell
# emu64:/ # whoami
# root
For more in-depth tutorial visit this post Beginner’s Guide to Setup Android Pentest Lab without Physical Device on Medium. Also take a look at Youtube tutorial How to set up Android Penetration Testing Lab from scratch (AVD without Android Studio). There is also a John’s blogpost Android Emulator Setup for macOS which can help you prepare the android virtual device environment. The LRVT’s blog Modern Android Penetration Testing Lab Environment might also come handy. Read the install BurpSuite CA Certificate to System Store in Android 10/11 on how-to procedure for MITM attacks.
References
Links to this note
duraki notes
* [Running Android Apps on MacOS](/running-android-apps-on-macos)
Android Reverse Engineering
To install the correct version of the Frida (ie. frida-server component) on the phone device or emulator, we need to know the processor version. Either plug the phone into PC, or start the Android emulator as described in Running Android Apps on MacOS.